Device Manager in Windows 7 works the same way it did in Windows Vista and XP. Device Manager
is designed to display information about the hardware installed on your
computer and as an interface to add and configure new hardware.
Hardware today follows a Plug
and Play standard. So most of the time, simply connecting hardware will
allow Device Manager (well, the OS processes controlling the device that
is displayed to you) to automatically configure it. Devices that are
not Plug and Play-compatible can be installed manually from Device
Manager as well.
In Windows 7, a new
functionality known as Device Stage has been added. It is a more
enhanced graphic output giving better details and functionality to
installed devices such as cameras.
You can use Device Manager
to ensure that all devices are working properly and to troubleshoot
misbehaving devices. For each device installed, you can view specific
properties down to the resources being used, such as I/O port
(input/output) and IRQ (interrupt request). Through Device Manager, you
can take the following specific actions:
View a list of all hardware installed on your computer
Determine which device driver is installed for each device
Manage and update device drivers
Install new devices
Disable, enable, and uninstall devices
Use driver rollback to return to a previous version of a driver
Troubleshoot device problems
1. New/Updated Features—Device Stage
Throughout the evolution of
technologies and PCs, one of the greatest features is how we can use
such a wide array of devices on PCs. Device Manager has allowed us see
all the hardware connected and make configuration changes, but utilizing
the features of the devices themselves has been left up to alternate
programs outside the Windows interface. Windows 7 introduces a new
specification for hardware vendors (knowing that most hardware comes
with software for the user to interface with), allowing them to provide
user access within Windows. The new feature and specification is known
as Device Stage. Windows 7 Devices And Printers is the interface for
displaying and accessing hardware supporting Device Stage. The Windows 7
Devices And Printers screen is shown in Figure 1.
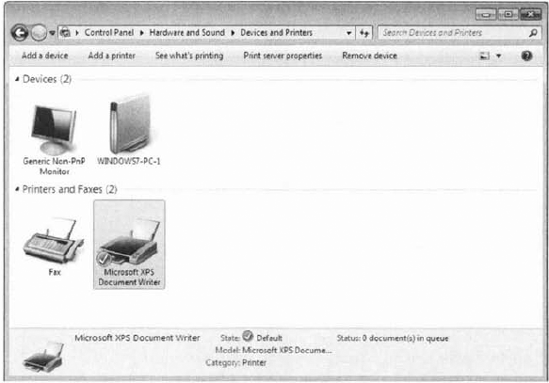
Take, for example, a digital
camera. When you connect the camera to the PC, the PC recognizes the
device (Plug and Play) and typically displays the camera as a mass
storage device. Users wanting advanced features like downloading and
editing the photos use another program. When you plug in a device that
supports Device Stage technology, Device Stage displays a single window
that gives you easy access to common device tasks, such as, in the case
of a camera, importing pictures, launching the vendor-supplied editing
programs, and simply browsing, all from one interface.
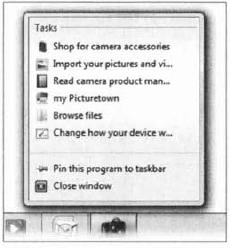
With Windows 7, you'll be able
to access all of your connected and wireless devices from the single
Devices And Printers screen, and the device will be displayed in the
Windows 7 enhanced Taskbar (Figure 2). From here, you can work with your devices, browse files they might contain, and manage device settings.
Wireless and Bluetooth
devices are also supported by Device Stage, making managing these
resources much more effortless for the end user. As portable devices are
disconnected and reconnected, the Device Stage-driven Devices And
Printers screen will update in real time. Exercise 1 will guide you through opening and viewing devices recognized on your Windows 7 machine.
Choose Start => Control Panel => Hardware And Sound. Choose Devices And Printers from the main window. To see options specific to a device, right-click the device.
To make it easier for the end user, Devices And Printers is also available directly from the Stan menu:
Choose Start => Control Panel => Devices And Printers. To see options specific to a device, right-click the device.
Even simpler yet, you can
click the Start button and type device into the integrated search box to
launch Devices And Printers, the first applet in the search list.
|
Next we'll take a look at using Device Manager to configure devices.
2. Using Device Manager
Device Manager is the
component in Windows 7 you'll use first to see which devices are
connected to your machine. More appropriately (and importantly), you can
see which devices Windows 7 has recognized. That is, if you install or
connect new piece of hardware and Windows 7 doesn't recognize it at all,
it won't be seen in Device Manager.
This would be an
unusual occurrence given the sophistication of today's hardware vendors
and the standards like Plug and play which are implemented. However,
this is an important step in seeing just which devices are known to
Windows 7, Keep in mind that we've been using Device Manager for many
versions of Windows, so what I'm discussing is applicable to legacy
versions as well. As seen in Figure 3, Device Manager has a fairly simple opening screen, but it has a lot of functionality behind it.
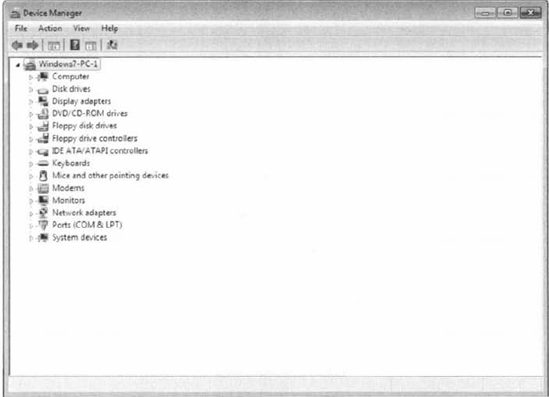
From the opening screen, you get a
good first feeling for the hardware that's installed and recognized and
for any major issues, such as a device that's recognized but has no
drivers installed or is not working correctly. You'll see a warning
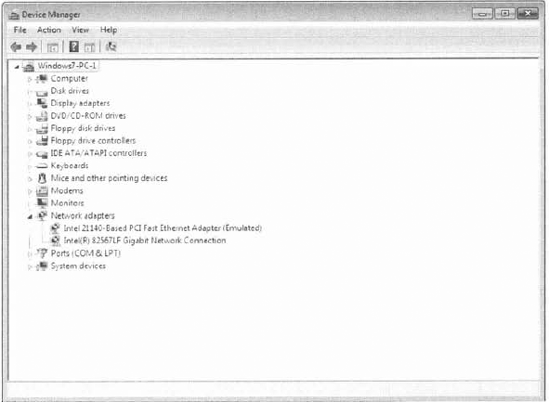
symbol displayed over the misbehaving device. For example, suppose you
have just installed a new network adapter but the device does not seem
to be working. You can open Device Manager and open the Network Adapter
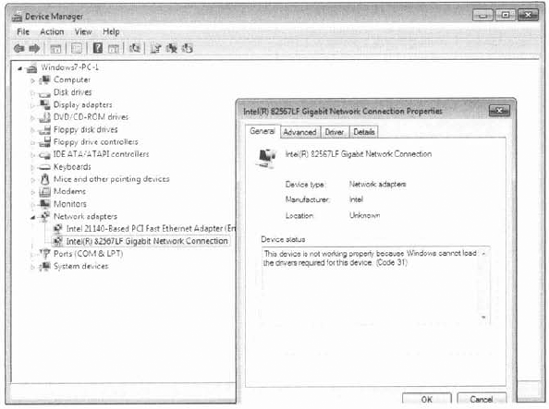
option to start the troubleshooting process. Figure 4 shows an issue with a network adapter.
To continue
troubleshooting the network adapter within Device Manager, you would
right-click the misbehaving adapter and choose Properties to see its
Properties dialog box (Figure 5). This is just a small part of the functionality within Device Manager.
There ate many reasons to
view the devices installed and configured on a machine. One reason is to
verify the type and status of hardware. For example, if someone in your
organization has given you documentation for a specific user machine
with the machine's hardware specifications and you are concerned that
the stated network adapter for the machine may not be the one actually
installed, you can use Device Manager on the machine in question to see
the network adapters Windows 7 recognizes in the machine.
In Exercise 2, you will view devices using Device Manager.
Choose Start => Control Panel => Hardware And Sound => Device Manager (under Devices And Printers). Click the triangle next to Network Adapters (or double-click Network Adapters) to expand Network Adapters.
|
The steps in Exercise 2
show one way to launch Device Manager, through Control Panel. This is a
valid method that shows you where the application resides, bur it is
not how administrators usually do it.
You may want to try the
following method because it puts Device Manager into a more functional
MMC, allowing access to more administrative tools from one location:
Choose Start and then right-click Computer.
In the Navigation pane of the MMC, select Device Manager.
I also sometimes type Device Manager
into the Windows integrated search box and press Enter. Or I
right-click Computer and choose Properties. All of these are means to
the same end.
2.1. Device Properties Available within Device Manager
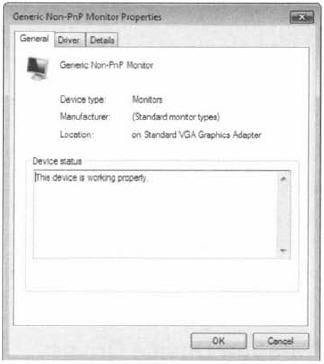
Once you have opened Device
Manager and have access to the installed devices on your machine, you
can view their Properties dialog boxes. From there, you can view and
change configuration parameters if necessary. You will find that the
tabs available in the Properties dialog boxes will vary from device to
device because the parameters that are available will vary with
different hardware. Most devices will have at a minimum a General tab, a
Driver tab, and a Detail tab, as seen in Figure 6.
The Properties dialog box for
most devices will include more specific tabs for the hardware
configuration, such as for a network adapter, which also has an Advanced
tab for more specific configuration parameters. Figure 7
shows a network adapter's Advanced tab selected with Connection Type
selected and the Value drop-down box active to show possible choices.
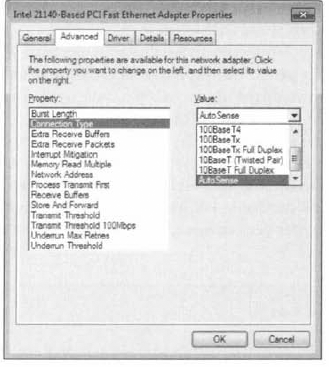
If you need to change the hardware configuration properties, Device Manager is the best way to access the parameters. Exercise 3 will show you how to view configurable properties for a network adapter through the Advanced tab.
Choose Start => Control Panel => Hardware And Sound => Device Manager (under Devices And Printers). Click the triangle next to Network Adapters (or double-click Network Adapters) to expand it. Right-click your network adapter and select Properties. Select various properties and view the parameters.
|
In addition to setting up
devices, you will need to install and configure device drivers, which I
will cover in the next section.